I'm going to kick this thread off with a story.

Once upon a time, Botboy3000 was bored in math class and he started looking for videos starring hacked calculators. He came across this video by Zeldaxpro and decided to do exactly that.

So, Botboy3000 set out to the mystical land of Amazon and found himself a gameboy advance sp. Once it arrived he took it all apart to reveal the magical motherboard he so desired (as well as the screen.) After many hours of soldering, cutting, melting, and gluing it was finally done..... but then the motherboard simply fried and would not turn on no matter what he tried.

Botboy3000 was not discouraged. (Ok, maybe a little bit.) Nonetheless he found another gameboy motherboard this time in the strange Bay of E. Contrary to the said arrival wating time of 3 days, it took 3 months to come. Botboy immediately went to work on his new motherboard and only two days after it arriving it was finally done. What Botboy called the Gameulator (but some call "Caluboy") was complete.
======THE END======

So, here is a picture and a link to a clip of it working and me failing at the game:
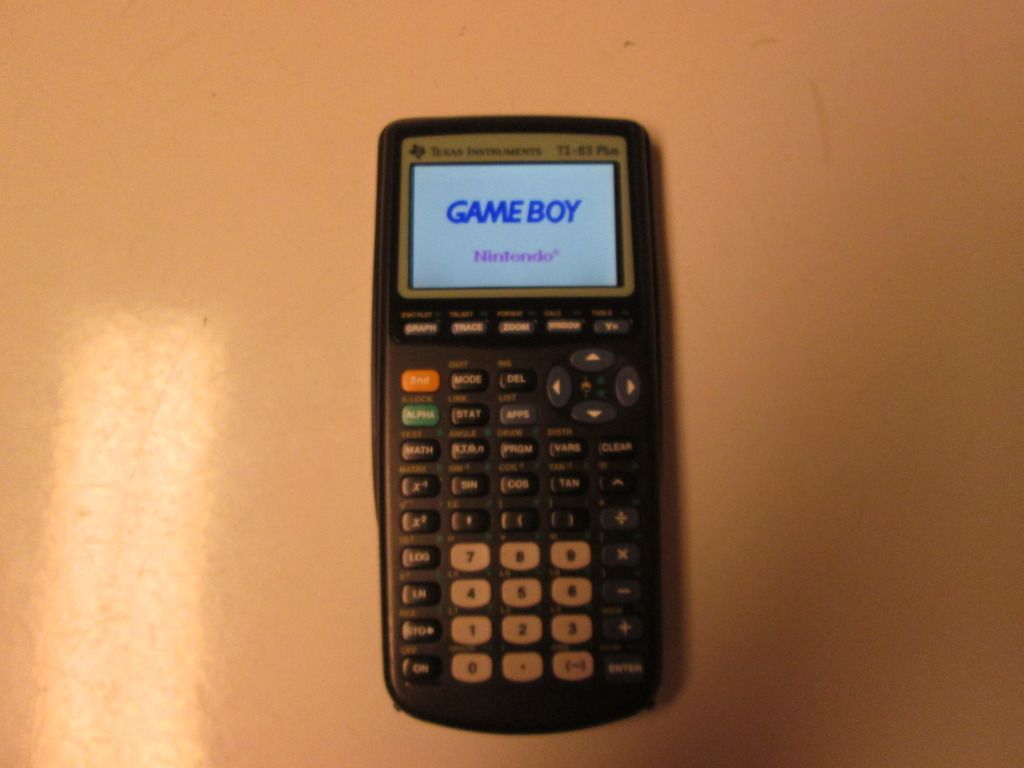


Key Maps:
==========
2nd = B
Alpha = A
Arrow keys = D-Pad
L & R = two buttons at the bottom of the calc that you push with your palms Razz

Any comments or questions are welcome in this thread! Very Happy It was an awesome project to do!
What are the keys for start and select? Also, how does the cartridge go in, and where are the charging and link ports? It looks very polished! Nice job!
Oh, I forgot to do those buttons. Very Happy Whoops! Ok, start is Mode (As soon as I finished soldering it I realized that STAT would been a much better buton for Start) and Select currently has no button mapped to it. I might try to do it later but hardly any games use it except for sleep mode so it wasn't very high on the priority list.

The cartridge plug was very poorly placed because it was the way I saw best for the thing at the time......... but I was wrong. You actually have to unscrew the entire back plate to change the cartridge. This is DEFINITELY motivation to make another, better one of these and maybe give my current one to my friend who only ever plays Pokemon Emerald on his GBA.

The charging ports are on the back with (crudely) cut holes for the plug to fit. When I make another I will probably use something more like a Dremel to cut out the holes rather than melting them with a soldering iron (our basement smelled like melting plastic for hours.)

When I make the second one the cart will DEFINITELY go in through the top and it will look more like Zeldaxpro's. Thanks for the comment though! I guess I made it look more polished than it really is with clever photography Razz
Botboy3000 wrote:
The charging ports are on the back with (crudely) cut holes for the plug to fit. When I make another I will probably use something more like a Dremel to cut out the holes rather than melting them with a soldering iron (our basement smelled like melting plastic for hours.)
Do you have a Dremel or a drill press? I think those would be more the correct tools to use to cut an aperture for charging (not to mention not ruining your soldering iron tips Razz).

Great work on this project; from the picture here, it looks very polished indeed. Did you use the calculator's original mainboard for the key contacts, perhaps by cutting and soldering onto traces, or did you use another method?
Botboy3000 wrote:
and maybe give my current one to my friend who only ever plays Pokemon Emerald on his GBA.

Or you could give it to me Razz
KermMartian wrote:
Do you have a Dremel or a drill press? I think those would be more the correct tools to use to cut an aperture for charging (not to mention not ruining your soldering iron tips Razz).

Yes, I do have a Dremel. and I completely agree that's what I should use.

KermMartian wrote:
Great work on this project; from the picture here, it looks very polished indeed. Did you use the calculator's original mainboard for the key contacts, perhaps by cutting and soldering onto traces, or did you use another method?

I did use the calc's original button contacts and some hot glue as stress relief for the solder contacts. Do you think there are better ways to do this part of the project for when I make a better one?
Make it using a Purple 83+ SE Razz

Also, how many speakers? Mono, stereo?
There is only one speaker because I just used the one that came inside the gameboy.

As for purple........ That'd be something I'd take into consideration. Very Happy
Botboy3000 wrote:
Do you think there are better ways to do this part of the project for when I make a better one?
That's what I would have done. The only thing that might be more polished would be designing and etching your own PCB for the buttons, but that's honestly overkill, in my opinion.
Haha! Yeah! That'd be awesome but agreed, overkill. I think most of what I did for this gameulator will be used for the new one except the placement of the motherboard and cutting of the case.
That's very nice! ( and I'm glad it's a finished project, in contrast to the myriads of topics of attempts.)

For some reason, I feel drawn to the concept of either putting one of those in a TI-81, just cause it's really old - or better, putting it in a CSE, because then it would look just a little closer to realistic (and yes, the CSE is less disposable, but I could simply make a new CSE case for it of wood).
CalebHansberry wrote:
or better, putting it in a CSE, because then it would look just a little closer to realistic


Yes, I agree a CSE would be a great choice for a new one of these but the problem with a CSE is the slidecase. With a TI 83 the slidecase goes in from the top and covers up the top where the cartridge would be inserted whereas a Ti 84 PCSE slidecase goes in the bottom where the screws that hold the casing together are too close to each other. Also the CSE is too rounded to be used in my opinion where the Ti 83 has lots of flat edges, especially at the top where flat edges are needed.
Here's a small update on this project that I did last night:


An added Headphone Jack. Maybe Kerm and his electrical engineering experience can help me get the speaker to work when headphones are not in and vice versa. Idk, maybe that's not possible given the size restrictions. But here it is! Any suggestions for changes are welcome! Smile
Botboy3000 wrote:
An added Headphone Jack. Maybe Kerm and his electrical engineering experience can help me get the speaker to work when headphones are not in and vice versa. Idk, maybe that's not possible given the size restrictions. But here it is! Any suggestions for changes are welcome! Smile
Very late, but hopefully not too late: many TRS jacks have a built-in switch, like this one from Mouser. The switch is generally closed when nothing is in the jack, and open when something's in the jack. That makes switching your amplifier circuit on and off very easy.
  
Register to Join the Conversation
Have your own thoughts to add to this or any other topic? Want to ask a question, offer a suggestion, share your own programs and projects, upload a file to the file archives, get help with calculator and computer programming, or simply chat with like-minded coders and tech and calculator enthusiasts via the site-wide AJAX SAX widget? Registration for a free Cemetech account only takes a minute.

» Go to Registration page
Page 1 of 1
» All times are UTC - 5 Hours
 
You cannot post new topics in this forum
You cannot reply to topics in this forum
You cannot edit your posts in this forum
You cannot delete your posts in this forum
You cannot vote in polls in this forum


Advertisement