
I give up. Good luck with your project.


flintymcqwerty wrote:
I give up. Good luck with your project.
Very well. That response does not say good things for your character, however.


あなたは私の命を奪うことはできますが、私の誇りを取ることができない
Later:
I can post the PM I sent Flinty. Judge for yourselves whether it was reasonable or not:
But anyway, with Flinty's kind nonsupport, I have begun... a fully functional wooden TI-82! I can no longer call it "Oaken". The case is made of a beautiful wood that is lighter, less brittle, and more moldable than oak, but hard - maple. The keys are pine, alder, one is of oak (the special 2nd key), and new to the project, the dark and attractive walnut! Pictures follow.
Beginning:

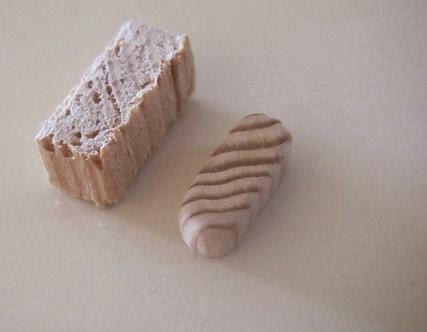
How I create the buttons:
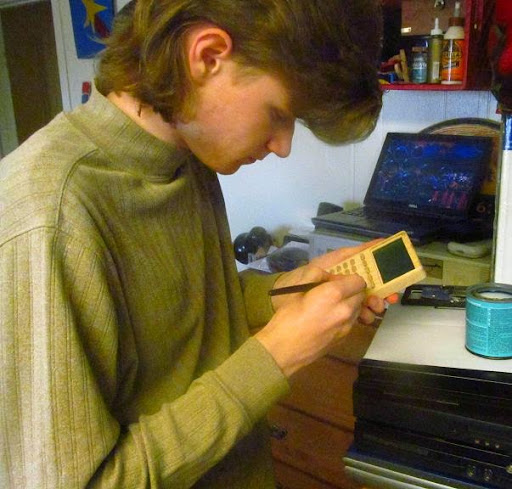
Showing off the drill I use :
:

A close up of how I create the buttonholes - and why they are round:

How it looked assembled:

Last picture, current status:

I can post the PM I sent Flinty. Judge for yourselves whether it was reasonable or not:
Quote:
Wow, that is extremely generous of you. But I am sure you can understand, I am constrained to be cautious. Firstly, are you rolling in money, or what, that you can send me a $120 calculator - and pay to do it by paying shipping? Just as I do not know you, and cannot necessarily trust a stranger with my address, so you would logically not be able to trust a stranger enough to send them a calculator, right? So on my part, do you have any contacts to prove your reliability (as I can use Kerm, Merth, and others), and on your part, is there any reason you would want to do this (like, being a wealthy philanthropist, or getting a calculator for free from school, or the president of TI in disguise)? Understand, I would be unable to buy one on my own, and would appreciate it greatly, but it is just that this seems too good to be true. Thank you!
But anyway, with Flinty's kind nonsupport, I have begun... a fully functional wooden TI-82! I can no longer call it "Oaken". The case is made of a beautiful wood that is lighter, less brittle, and more moldable than oak, but hard - maple. The keys are pine, alder, one is of oak (the special 2nd key), and new to the project, the dark and attractive walnut! Pictures follow.
Beginning:
How I create the buttons:
Showing off the drill I use
A close up of how I create the buttonholes - and why they are round:
How it looked assembled:
Last picture, current status:
あなたは私の命を奪うことはできますが、私の誇りを取ることができない


Wow. This is amazing. My dad works with wood and has remodeled much of the house with his woodwork; kitchen, master bath, dining room, TV room, etc.
What is your plan for the buttons staying in? Is that paper-looking backing going to hold them in or are they wider/lipped at the bottom? Is the recessed screen to hold a hard plastic cover? Or is it for another inlay? Do you plan on engraving the button names with a wood burning pen?
Not related to the calculator, but you might want to consider building yourself a taller, wider, longer, sturdier table to work on.

There are two types of people in the world: those who can extrapolate data from incomplete data
comicIDIOT wrote:
What is your plan for the buttons staying in? Is that paper-looking backing going to hold them in or are they wider/lipped at the bottom?
Ah, you nailed it comic. I've been looking at this for several minutes, trying to figure out what was wrong with the picture.
I, too, am curious on how you are going to have the buttons stay inside
Upon looking at the picture longer, it's not paper but a foam core of some sort. Maybe double side sticky foam that will push in and also push the button back up. Since the buttons will need to, naturally, stay off the trigger and the elasticity of the foam may provide that.
There are two types of people in the world: those who can extrapolate data from incomplete data


This is extraordinarily impressive, Caleb. I am in awe of your woodworking skills. I certainly hope that one day I might be able to purchase an oaken case for one of my TI-83+SE and/or TI-84+SE hardware mods.


Well, all this discussion/discovery is interesting, but it is just paper. Sad to destroy my reputation for ingenuity, but yup. It is three layers of cardstock, glued together. And yeah, it will be sufficient to keep the buttons in - I glued the paper on with wood glue. Plus, there is no getting a grip on the buttons to pull them out: unfortunately they are only about 3/32 inch above the front of the calc. As for the inlay, I do plan to include a piece of clear plastic over the screen.
And as for the button labels - that is a problem. I was thinking that if I did it at all, I would woodburn them on, but I realized that will be impossible, especially with the walnut - you would be unable to read them! They must be white! So if anyone has any suggestions for that, let me know!
And as for the button labels - that is a problem. I was thinking that if I did it at all, I would woodburn them on, but I realized that will be impossible, especially with the walnut - you would be unable to read them! They must be white! So if anyone has any suggestions for that, let me know!
あなたは私の命を奪うことはできますが、私の誇りを取ることができない
You could woodburn them still, then use a really fine artists paintbrush. You could also, pant the buttons a color, then make templates for the letters and sand the paint away. So, what you are left with is either the text or the whitespace in paint. Then apply a finish to each button so the paint won't chip of fade.
The finish will add some thickness, so make sure it won't interfere!
The finish will add some thickness, so make sure it won't interfere!
There are two types of people in the world: those who can extrapolate data from incomplete data
I was going to propose putting masking tape on the buttons, cutting out the letters with a very fine, very sharp hobby or xacto knife, then paint over the whole thing. Then top it off with a coat of varnish. You might be better able to make nice-looking letters with a paint pen, though.
Here is the current progress:

And as to the button legends, I'm thinking that the easiest solution will be to use a white paint pen and write them on.
And as to the button legends, I'm thinking that the easiest solution will be to use a white paint pen and write them on.
あなたは私の命を奪うことはできますが、私の誇りを取ることができない
That looks great! While I know I suggested it, I've since re-thought the paint pen idea a bit. You have such a nice pure wood look going there that I feel white paint might sully it a bit. Using a very fine-tipped soldering iron to burn the wood is out of the question?

: TI Runner-Up")

That is amazing! I also like the idea of perhaps burning in the text for each key, but a dedicated wood-burning pen is probably a better idea than abusing your soldering iron. And you probably want to stencil out those fonts first as well....

Well, the difference in wood color is a problem: Woodburning (and I'd use an actual woodburning tool, as my soldering iron actually is a woodburning iron) is out of the question for the walnut, as the color of the walnut is darker than if I woodburned the entire surface of a light wood. But I could woodburn the others, though it would be easier to use a black paint pen.
So in closing, I could get away with painting only the walnut and woodburning the rest, but that is all.
So in closing, I could get away with painting only the walnut and woodburning the rest, but that is all.
あなたは私の命を奪うことはできますが、私の誇りを取ることができない
Alrighty, back from a super-long break. I was clueless as to how to make the batteries fit in the hole in the back, so it was only now I finally decided to take what seemed to be my only option, and cut the battery holder out of my donor TI-82 and stuff it in! Not pretty, but it did fit at least. I was having an impossible time trying to get the metal tabs to just attach to the wood of the case. So, here are pictures of the current progress!

Me varnishing it. Sadly this one is not screwed together, but glued together, which has a lot of bad things about it, but this was a test run of making a working model, and that is one of the things I'm getting straightened out. And, I'm using Polycrylic, which being water-based, dissolves over time from the oils on your skin, making it not suitable for handling a lot like a plastic calc. I chose it because first of all I don't know of anything better but Spar Urethane, which is oil-based, but yellow, and I didn't want the white paint to have a yellow tint, and second of all, Polycrylic is very hard, clear, dries fast, and is easy to work with.
Here is a picture of the white painted on buttons. I don't think there is a stencil that small. And they look sorta like graffiti, as I expected. But there they are, the simplest first, for practice. I'm still unsure of whether or not I want to woodburn the rest or paint them in black; the number keys will be white, I think. Suggestions?

The decimated original case:

And here is an older picture of it I never posted:

Me varnishing it. Sadly this one is not screwed together, but glued together, which has a lot of bad things about it, but this was a test run of making a working model, and that is one of the things I'm getting straightened out. And, I'm using Polycrylic, which being water-based, dissolves over time from the oils on your skin, making it not suitable for handling a lot like a plastic calc. I chose it because first of all I don't know of anything better but Spar Urethane, which is oil-based, but yellow, and I didn't want the white paint to have a yellow tint, and second of all, Polycrylic is very hard, clear, dries fast, and is easy to work with.
Here is a picture of the white painted on buttons. I don't think there is a stencil that small. And they look sorta like graffiti, as I expected.
The decimated original case:
And here is an older picture of it I never posted:
あなたは私の命を奪うことはできますが、私の誇りを取ることができない
That looks predictably superb. For the battery case, perhaps you can make the battery door have tabs and screw on, like with the TI-84+CSE? I am pretty confident that there are stencils that small, but your pens would probably not fit in those stencils.
Hmmmmm. I'm stumped atm about the battery door, so thanks for the suggestion. I think due to the non-springy nature of wood I can't make it just like the real TI-82, which is always sad. I did, indeed, plan to use screws to attach it to the case; the issue being first, that the screw for the backup battery (fitting that in was hard, there is a wire embedded in the wood!) is in the way, and second, that it'd require precise fitting, which I can do but is just time consuming. Oh, and that the wood would be extremely thin, almost as thin as a few layers of cardstock >_>
あなたは私の命を奪うことはできますが、私の誇りを取ることができない
CalebHansberry wrote:
[...]Oh, and that the wood would be extremely thin, almost as thin as a few layers of cardstock >_>
Would using balsa for the battery door be an option, then? It's quite soft, which is not the best in terms of strength, but at least it's super-thin. 

: 2nd Place")

Register to Join the Conversation
You cannot post new topics in this forum
You cannot reply to topics in this forum
You cannot edit your posts in this forum
You cannot delete your posts in this forum
You cannot vote in polls in this forum
You cannot reply to topics in this forum
You cannot edit your posts in this forum
You cannot delete your posts in this forum
You cannot vote in polls in this forum
Advertisement